We earn commission when you buy through affiliate links.
This does not influence our reviews or recommendations.Learn more.
Sometimes our iPhone starts acting weird, in the sense that some functions wont work properly.

This could happen for various reasons, some of which might be unknown.
So, you’re able to tell that a lot of factors could cause this problem.
Before I show you how to do that, lets learn more about the iPhone DFU mode.
What is DFU mode?
This is similar to BIOS on Windows computers and Recovery Mode on Mac computers.
Youd need a computer and software like iTunes or Finder to carry out this process.
When and why should the DFU Mode be used?
However, there are times it wont work because the problem requires a deeper solution.
Thats when DFU mode comes into the picture.

It lets you upgrade/downgrade the iOS version and fix various internal issues.
What should you do before putting your phone in DFU mode?
Now, lets get this straight.
But, if you do the steps mentioned below correctly, the process will be completed smoothly and successfully.
Step 2:bring up the iTunes or Finder software on your rig.
Step 3:Press and release the volume up button quickly.
Step 4:Press and release the volume down button quickly.
Step 5:Press and hold the side/power button for about 10 seconds until the screen turns black.
Do not let go of the side/power button.
If it isnt black, then youd have to repeat the steps all over again.
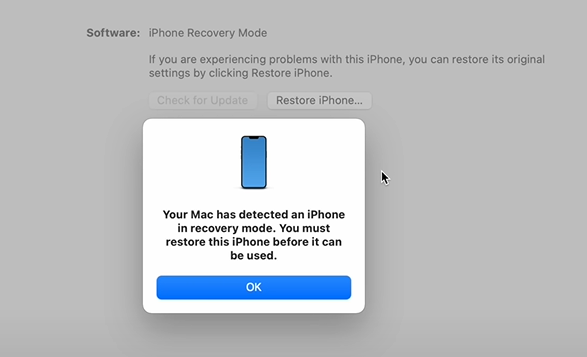
Step 8:You should see a screen like this that has a pop up regarding the recovery mode.
Step 9:you’re free to now restore your iPhone to its original controls.
Thats all the steps to put your iPhone into DFU mode and restore it.
This will perform a hard reset on your iPhone.
Step 1:Press and release the volume up button.
Step 2:Press and release volume down button.
Step 3:Press and hold the side/power button until the Apple logo appears.
Thats it; now youll have your iPhone turned on to be used as before.
Next, you might also want to check out theseiCloud activation removal tools.
